
Non-optimized images can take up unnecessary disk space on your server or slow down the loading of your web page. If you want to know how to optimize them, keep reading!
To solve the problems that an excessive weight of our images can cause, we are going to see two of the best to optimize your photos, using WordPress plugins and online editing tools.
Before going into flour with it, we will review the essential concepts for working with images online so that you understand the why behind what we will do here.
All these “tricks” for the images that we are going to see in the end are part of doing a good SEO job, which every website should consider.
Also Read: How to Build a Website: Step-by-Step Guide in 2021
Page Contents
Why Is It So Important to Optimize the Images on Our Website?
When we upload a photo to WordPress, the platform creates copies of it, with different dimensions. The idea is that, depending on how large the image appears on the page, use the smallest image in dimensions (and therefore lightest) possible.
Photo by photo, copy by copy, all these images can take up a lot of space on your web server without realizing it.
Also, when we upload the original photo, if it is excessively “heavy” (it has a large file size) it will slow down the loading of our website, and, also, Google will understand that our page is “slow”, and it will lower the ranking of the page.
But don’t worry, in this article we are going to learn how to access them and see how big they are, what they occupy on your server, and how to optimize them.
Improve loading speed
When we click to navigate a website, the page has to load all its content.
Therefore, the less heavy, less size, and less number of images we have, our page will take less time to load.
This is not only essential to improving the user experience (it has been found that 50% of users expect it to load in less than 2 seconds) but because the more agile our website is, the more Google will like it.
In turn, it will mean that you appear higher or lower in user searches and, therefore, you are more visible to the world.
What Is Lazy Loading and How Does It Increase the Speed of Our Website?
The deferred charge is a technique for that, as we are browsing a website containing images leave loading as will be seen, not blow when we get into the page.
As we have already seen, these types of files are the ones that occupy the largest size, and logically the ones that take the longest and most consume when loaded.
Therefore, if the videos and images are not uploaded until they are necessary, it is an incredible saving for our website.
Throughout this post, we will see the way we consider the most efficient to achieve lazy loading on your website.
Increase the free space of the disk
All content that is displayed on a web page, or that is part of its structure, has to be stored on a site, which has a certain space.
In many cases, images make up more than 50% of the total page weight.
If, for example, we have a travel blog where we constantly upload files of this type, we will have a greater risk of taking up much more space. However, if we have a blog that has a lot of text and few images, the occupied space will be less.
Also, we must remember the copies that WordPress makes of our images.
We must review those that are necessary.
To give you an idea we are going to give an example. We upload a post to WordPress with 5 photos. The platform is going to upload another 4 copies of each of our photos (it already has a total of 20 photos), of which we are only using 20%, but they are taking up space.
Both in WordPress.com and WordPress with hosting ( wordpress.org ), the plans usually have certain limits of space, therefore, the saving is not only space, it is money.
Check the Speed of a Web Page With Google Pagespeed insights
About the above, and as a tool to measure the loading speed of our website, there are PageSpeed Insights from Google. Thanks to this page, we will be able to review how fast our site loads and identify possible failures.
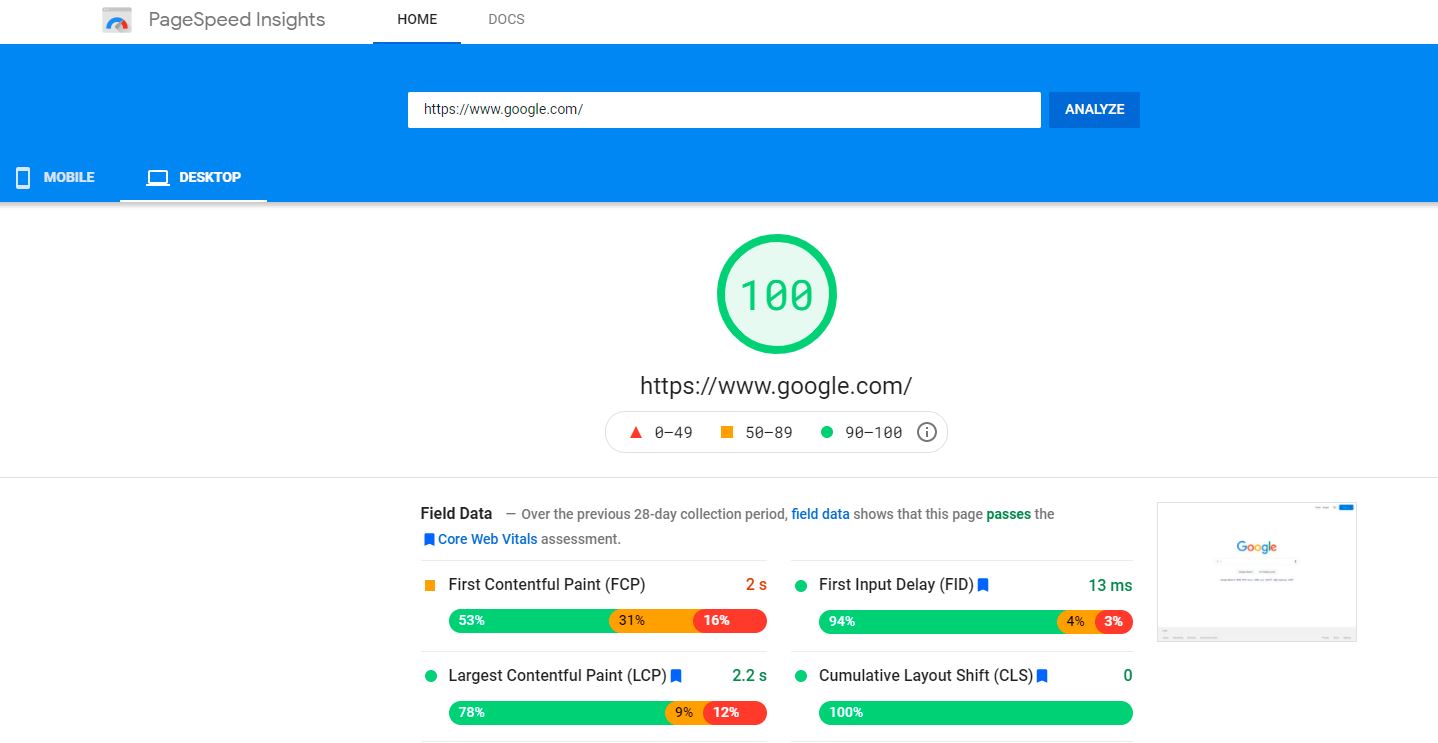
We just have to copy the address of the page that we want to analyze and copy it in your search bar. It returns us a fairly detailed study on what may be causing the load to slow down or what we could improve.
When we click on ” analyze”, it returns us a general analysis of this website, together with a fairly detailed study on what may be slowing down the load and what could be improved.
Previous Concepts: Weight, Size, and Dimension of Images
The weight of the file is the amount of space in memory or disk that our file occupies when storing it. It is measured in bytes and depends on its size in pixels and the color depth (also in pixels) of the file.
If a photo is heavier than optimal, it will slow down the loading process of the page it is on. And users do not like that (and Google, either).
Regarding the size or dimension of the photograph, one that is too large will also slow down our website, since it increases its weight, and too small a size will decrease its quality and our photo will not look good; apart from not being anything aesthetic.
The format is the way our image is saved, and for each type of image, we have one more suitable than another.
The most used today are PNG (recommended for screenshots) and JPG (recommended for photographs).
How We Can Optimize Images Without Losing Quality
There are several ways to do it, but we have wanted to bring the simplest ones and that will give us the least problems in the future :
- Some online tools to do it manually.
- The WordPress plugins.
While, with the plugins, you only have to choose which one best suits your needs and install it, with the tools you will be the one to do it manually.
Each method has its advantages and disadvantages, so we recommend that you try and choose the one that you feel most comfortable with.
But, before we start, we must review the WordPress settings about media, where the upload conditions of our photos are defined, regardless of the image optimization method you choose.
Read on to find out more!
WordPress configuration to optimize our photos
Before, and as a compliment, to the optimization of the images, we must review the WordPress settings.
When we get into the main panel, we see on the right the “Settings” section, which in turn contains the “Media” section. Click there.
First, we are going to find the image size setting, where it is specified that “determine the maximum dimensions to use when adding an image to the media library. “
As we have spoken before, when we upload a photo, WordPress creates different copies with different sizes, to adapt the image depending on where it is displayed.
Well, here we are going to adjust the maximum size, in pixels, that these copies will have.
There are three categories: thumbnail, medium, and large. Each one has a preset value, like the one we see in the image:
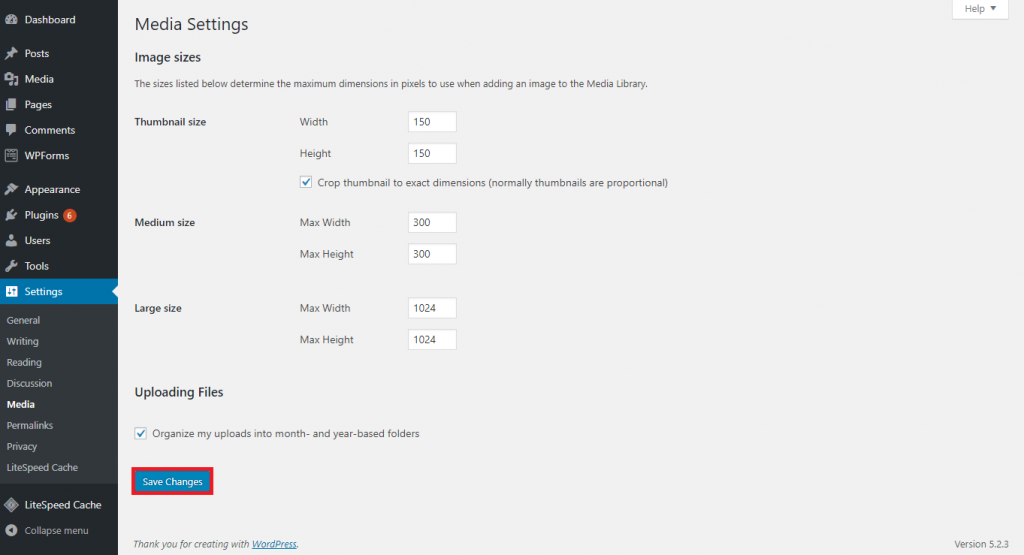
The image that we upload will be adapted to the measurements that we establish, but keeping its original proportions in the medium and large size copies.
However, in the small size copies, we have the option of cropping the thumbnails in the exact dimensions to which we determine here.
For example, if we leave the default measurements of 150 x 150 and check the box, our copy will be 150 x 150.
Be careful and calculate the dimensions well!
Also, if the original image is smaller than the dimensions of the copies, it will not be generated.
For example, when I upload a photo of 800 x 600px, I don’t know how it will generate the large size copy (1024 x 1024), since it would not make sense, it would not improve quality in any way.
To choose the right size, you should think about the design of your blog or website, and adapt the measurements of the images to it.
Tools to improve the quality of our photos online
Once we have correctly established the settings with which our photos will be uploaded, we will optimize them. This option is to edit our photos manually, through some applications accessible to everyone.
The advantage of using these tools is that you have full control over the process. The downside is that it will take a little longer, but if you have a blog with few photos you will not have any problem.
From Citizen 2.0 we recommend two of the most famous: TinyPNG, to reduce weight, and Picresize, to reduce size. You can also use Image Resizer which does both, but not as optimally as the other two do separately.
But note that, if you already have an application for it installed on your computer, or you usually use one, perfect. Here are our recommendations:
TinyPNG: How to reduce the weight of a photo
This tool reduces the weight of the photos that we upload, with a very simple to use interface, and allows us to upload up to 20 files at the same time:
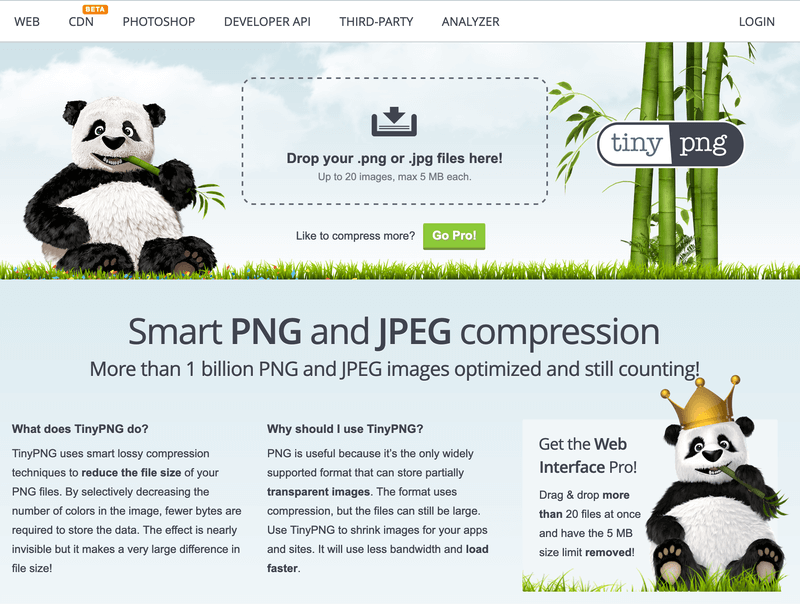
To begin, we click inside the square of lines, where it says ” Drop your .png or .jpg files here!”.
When we click, we open the folders on our computer, select our file and upload it:
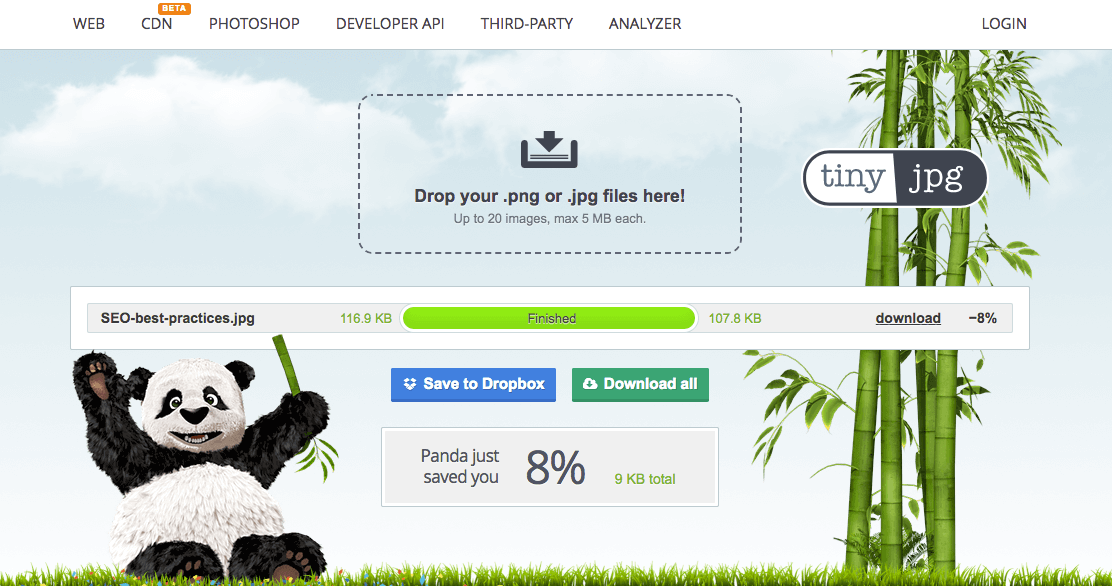
When the green bar reaches the end, it means that the process has finished and we will have our image ready.
We have the option of saving the images in our Dropbox or downloading a zip with the folder that contains the images, by clicking on the green button, where it says “Download all”.
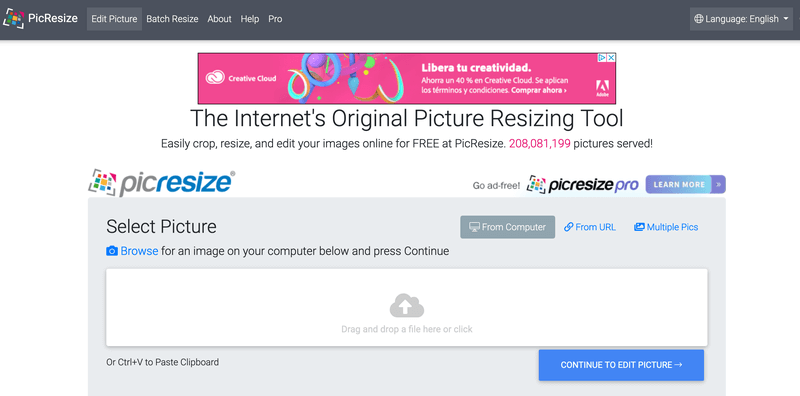
How to reduce the size of a photo with Picresize
Thanks to this website, we can reduce the size of our photos quickly and easily, being able to upload a single file or several at the same time.
When we go to the main page, we will see a square with the symbol of a cloud and an arrow. We click there and look for where our file is on our computer.
Once we have found it, we click on the blue button ” Continue to edit picture “:
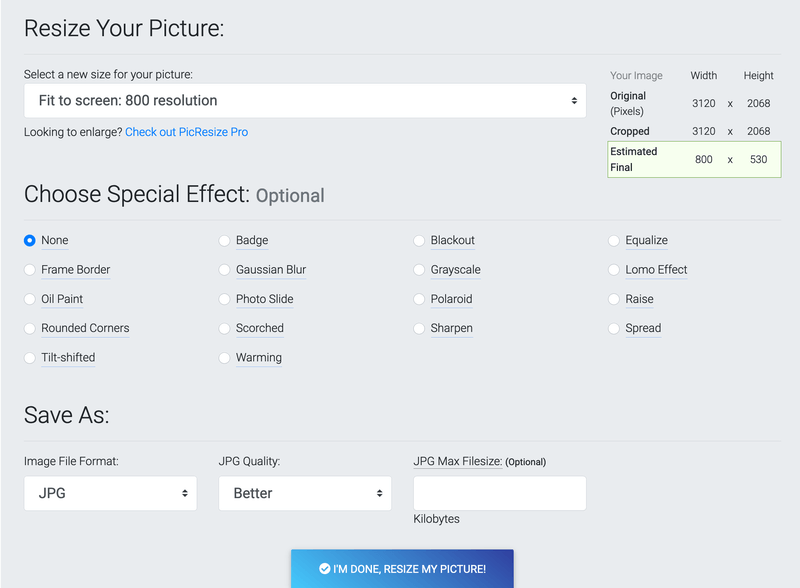
A new page will open, where we will see the chosen photo. Make scroll down until you see the image on your screen where we select the features you want to have the picture.
In the first drop-down, we have the option to choose the size of our photo. In this case, we have chosen 800px wide, but you can customize it according to what you need.
On the right, we see a small square where it indicates the estimate of the total dimensions that we will have.
If we do not want any effect on our photo, we go directly to the section at the end where it says
” Save as “, and we choose the format in which we are going to download our photo.
When you’re done, click the ” I’m done, resize my picture!” :
Finally, we will arrive at this screen, where we click on ” Save to disk ” to download the image that we have retouched:
Finally, the file will be downloaded to us.
Image Resizer and how to edit the size of our images online
Another essential site for photo editing is Image Resizer. With a similar operation to Picresize, we find a simple cover, with a green central button, in which the phrase ” Select Image ” appears. Click on it and choose the photo to edit.
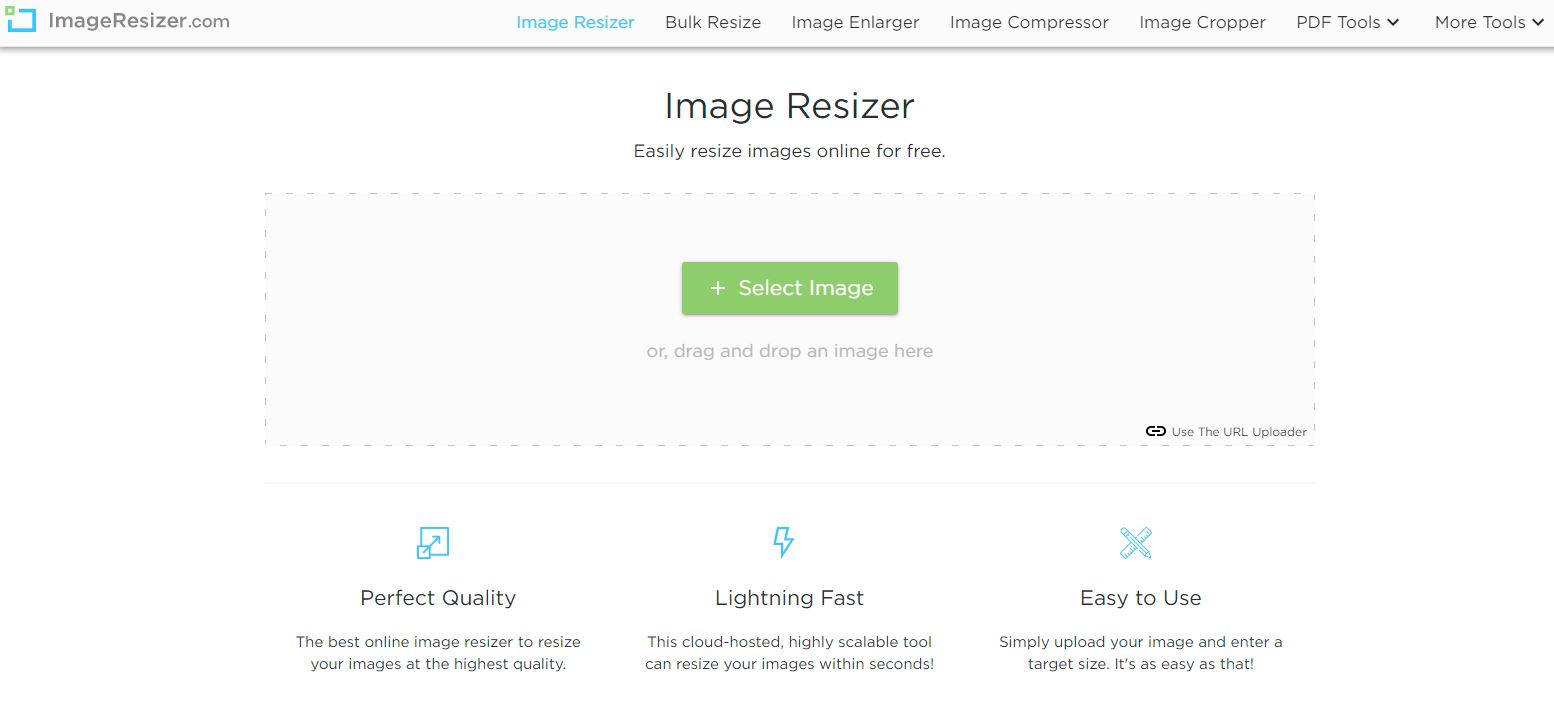
Not only do we have the option to reduce its size, but we can also crop, rotate and flip it.
In the ” Resize ” section, we must indicate the final size we want. We have the option to select the width in pixels, cm, and many more measurements, as well as the download format.
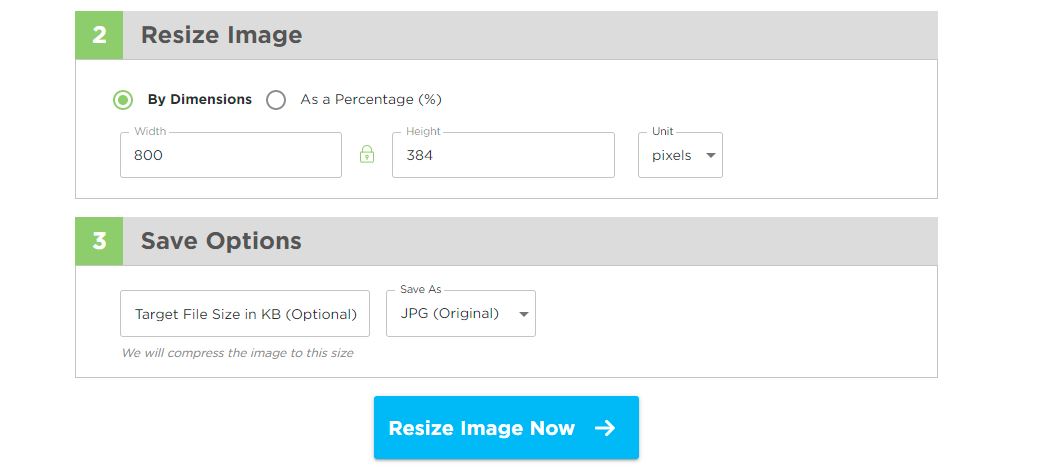
When you’re done, click ” Resize Image Now .”
The big difference between Image Resizer and other online editing tools is that it shows us in a table the measurements, in pixels, before and after editing.
When we are sure that we have finished the process, we click on “ Download Image ”, and the already edited photograph will be downloaded. We have the option to download the file as. PDF, PNG, and in a compressed file (zip).
The best plugins to optimize images in WordPress
Working with WordPress plugins has many advantages. They automate processes, add functionalities… in short, they greatly facilitate our work. And image optimization was not going to be less.
You just have to choose the one you like the most and install it. Of course, it is highly recommended that it be reviewed periodically since, whenever we automate, we lose some “control” over the process.
But don’t worry, it’s not a difficult task at all and it won’t take you more than two minutes.
Now is the time to investigate the characteristics of each plugin and choose the one that best suits our way of working.
Reduce the size of photos without losing quality with EWWW Image Optimizer
In the number of downloads, EWWW Image Optimizer is behind Smush and with a rating of 4.7 out of 5. This plugin also automatically optimizes the images you choose and even the previously uploaded ones.
This will help us improve the loading speed of our website.
One of the great advantages of EWWW is that the photo compressions are done locally, on your server, and it does not have to connect to an external one, which translates into considerable time savings.
Another great functionality that this plugin has is to be able to change the image to the smallest format that converts it. That is, if the plugin sees that our photo will occupy less in .png, it will suggest changing it.
Although it is a free plugin with a Premium option, its free features are very extensive. It is a great advantage over Smush, which has its free version much more limited.
Smush: how to optimize images for our website
With more than a million downloads, without a doubt, one of the most famous for its usefulness is Smush.
This WordPress plugin is an ” all in one “, which allows us to perform the necessary tasks to optimize our images, such as automatically resizing or compressing them.

Also, it does not matter that they are already uploaded, we can adjust images from other old posts.
One (of the many) strength of this plugin is its incorrect size photo finder, with which it will warn you of any suspected errors.
However, the free trial version is limited, so if you want more coverage you will have to pay for it.
You can compress images in PNG, JPEG, and GIF formats up to 32 MB, but with a limit of 50 images in its free version.
Imsanity and how to reduce the size of many images at once
Imsanity, valued with 5 stars, automatically resizes the images that we upload to our WordPress site, being able to configure with the parameters that we want.
It also allows you to scale images already uploaded to our site in bulk, which could save us a lot of time.
It is recent and does not have many downloads, but it does update every little time.
Increase loading speed with Lazy Load
Lazy Load is a free plugin with more than 100,000 downloads and a rating of 4 out of 5, that you will only have to download and install, but we do not have to configure anything.
The objective of this plugin is not to optimize the image itself, but to increase the loading speed of your web page through lazy loading.
This method consists of only loading the images that are currently visible.
That is, as we scroll through the screen, the other images will be loaded.
Important! Do not forget that before, our images have to be optimized. It would be a complement to all of the above.
Conclusions
As we have already seen, multimedia files occupy a large part of the space where your website is hosted, as well as being the type of elements that weigh the most when loading the page.
Therefore, a good job of optimizing images, in addition to saving space (and in the long run, money), will make your website load faster, which in turn will make users like it more, and Google, for which, also, will raise positions in the searches.